

Step by Step Guide: Fly Tying for Beginners JuJu Baetis Nymph
Featuring : The Orvis Company
Introducing the JuJu Baetis Nymph – a proven favorite among fly anglers for imitating the elusive Baetis mayfly nymph.
In this step-by-step guide, we'll walk you through the process of tying this highly effective pattern, that has been staple in the box for many years.
Whether you're a beginner looking to expand your fly tying repertoire or a seasoned angler seeking a reliable nymph pattern, join us as whip up the JuJu Baetis.
Materials Needed:
Hook: Nymph hook, size 16-20.
Bead: ( optional) Tungsten or brass bead to match hook size.
Thread: 6/0 or 8/0 thread in a suitable color (e.g., black, brown, or olive).
Tail: Pheasant tail fibers or synthetic substitute.
Body: Thin wire (copper, silver, or gold).
Wing Case: Pearl or flash tinsel.
Thorax: Dubbing (natural or synthetic) in olive or brown.
Legs: Natural or synthetic nymph legs (optional).
Step 1: Secure the Hook
Slide the hook into the vice and secure it in place. Start your thread wraps behind the eye, securing it firmly.

Step 2: Tie in the Tail
Take a few pheasant tail fibers or synthetic substitute and tie them in at the rear of the hook shank, extending backward to approximately half the length of the hook.
Step 3: Add the Body
Tie in a piece of Magic Quill (copper, silver, or gold) at the base of the tail. Secure it along the hook shank with tight thread wraps, stopping just before reaching the eye.
Step 4: Form the Body
Begin wrapping the magic quill forward in tight, touching turns, creating a segmented body as you go. Ensure it is evenly spaced and secure it behind the eye. Trim any excess.
Step 5: Tie in the Wing Case

Cut a small strip of pearl or flash tinsel and tie it in at the front of the thorax, leaving it to extend backward over the body as a wing case. Trim any excess material.
Step 6: Split Wings
Apply a small amount of dubbing to your tying thread, creating a dubbing noodle. Wrap the dubbing around the hook shank just behind the bead, building up a slightly thicker thorax.
Step 7: Form the Wing Case

Pull the wing case material over the top of the thorax and secure it behind the eye with several tight wraps of thread. Trim any excess material.
Step 9: Finish and Trim
Make a few whip finishes behind the eye to secure the thread, then trim it off. Optionally, apply a small drop of head cement or UV resin to the thread wraps for added durability.
Step 10: Final Touches
Trim any overly long fibers from the tail or wing case to achieve the desired proportions. Your JuJu Baetis Nymph is now complete and ready to imitate the small mayflies that trout love to feast on!
One of my favorite videos on this Pattern From: The Orvis Company ………..
From: The Orvis Company
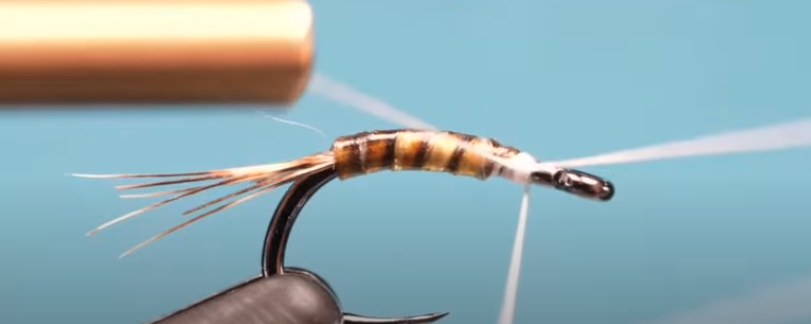
This is a slim, unweighted pattern that works good before a hatch and in the initial stages of a blue-wing olive mayfly hatch. Because it is unweighted, it can be hung under a small dry fly or fished deeper behind a heavier nymph like a stonefly. It's a very popular nymph because these small mayflies are found in trout streams around the world, and hatch fom early spring through late fall. JuJu Baetis Nymph
Hook: Short shank hook like Scud hook or Fulling Mill Grub Boss Black Nickel, size 16-20
Thread: White and black 12/0
Tails: Brown partridge or speckled hen fibers
Body: Magic Quill, colored olive/brown with permanent marker
Wing case: White Antron, Sparkle Hair, or similar fine synthetic fiber, overlayed with pearlescent tinsel
Legs: White hair from wing case divided and trimmed