

Step by Step Guide: Fly Tying for Beginners The Psycho Ant
Featuring : The Orvis Company
Introducing the Psycho Ant – a highly effective dry fly pattern designed to mimic the appearance of an ant on the water's surface.
In this guide, we'll walk you through the simple steps of tying this versatile fly which has become one of our favorite summer patterns.
Whether you're a novice angler looking to expand your fly-tying skills or a seasoned fly fisher seeking a reliable pattern, join us as we learn to tie the Psycho Ant.
Materials Needed:
Hook: Dry fly hook, size 10-16.
Thread: 6/0 or 8/0 thread in a suitable color (e.g., black, brown, or red).
Foam: Thin foam sheet in black or red.
Body: Dubbing (natural or synthetic) in black or red.
Legs: Black or brown rubber or silicone legs.
Wing: White or cream poly yarn.
Step 1: Secure the Hook
Place the dry fly hook securely in your vise and start the thread behind the eye of the hook. Create a thread base along the hook shank, stopping just above the hook point.

Step 2: Prepare Foam Body
Cut a thin strip of foam, about 1/8 inch wide and 2 inches long. Fold the foam strip in half and cut it at an angle to create a tapered body shape.
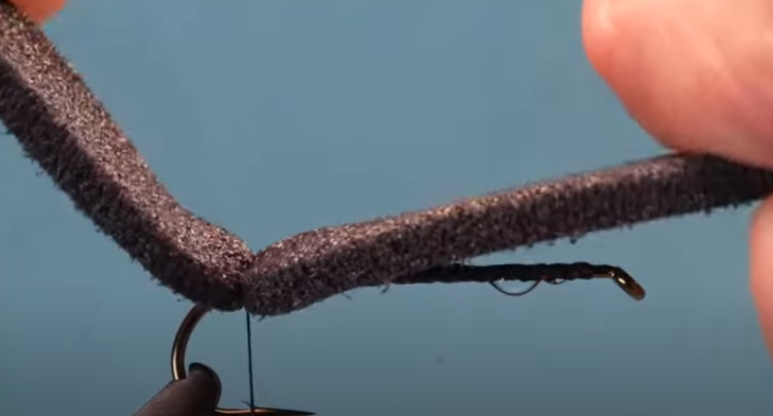
Step 3: Tie in Foam Body
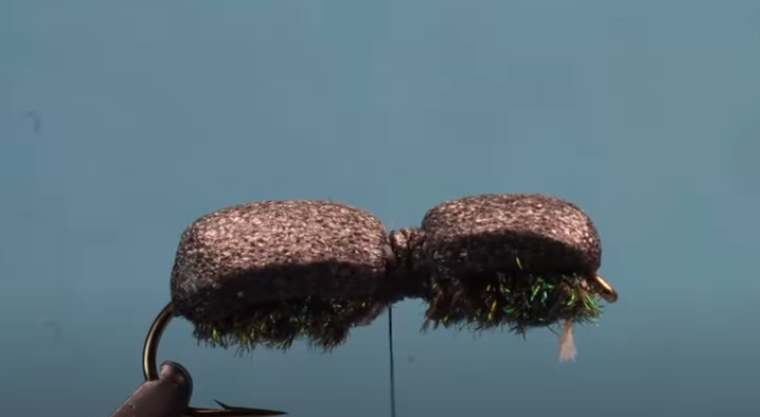
Take the tapered foam strip and tie it in at the base of the hook shank, leaving a small tag end extending beyond the eye of the hook. Secure the foam with tight thread wraps, forming the abdomen of the ant.
Step 4: Add Dubbing
Apply a small amount of dubbing to your tying thread, creating a dubbing noodle. Wrap the dubbing around the hook shank to form the thorax of the ant, leaving some space behind the eye of the hook.
Step 5: Attach Wing
Cut a small clump of poly yarn and tie it in at the top of the hook shank, just behind the eye of the hook. The poly yarn should extend slightly beyond the bend of the hook to form the wings of the ant.

Step 6: Add Legs & Hackel
Cut two small pieces of rubber or silicone legs and tie them in on each side of the thorax, just below the wings. Position the legs to extend outward from the body of the ant. Next tie in your hackel and wraparound two or three times then tie off and clear any excess material.

Step 7: Finish and Trim
Make a few whip finishes with your tying thread behind the eye of the hook to secure the materials in place. Trim any excess thread and foam tag end.
Step 8: Final Touches
Trim the wings and legs to the desired length, keeping them proportionate to the size of the fly. Optionally, add a small drop of head cement or UV resin to the thread wraps for added durability.
Your Psycho Ant fly is now complete and ready to float on the surface, imitating a struggling ant and enticing hungry trout!
Below is a step-by-step guide to tying the Psycho Ant From The Orvis Company Go check out all their vids in the link …….
From: The Orvis Company
This is one of those great foam-bodied, highly visible dry flies for imitating large terrestrials. It's perfect for dry/dropper combo. Tie along with Tom or just watch and spin up a few later on the replay.
Psycho Ant Hook: Size 4-12 3XL nymph or 2XL dry fly hook
Thread: Black 3/0 (140 denier)
Body: Peacock herl
Overlay: Black foam
Wing: Pearl Krystal Flash and white Ultra Dry Yarn or Para Post
Legs: Black and white barred silicone legs
Hackle: Black saddle hackle