

StepsbyStep Guide: Fly Tying for Beginners | The Beadhead Pheasant Tail
Featuring: Jim Misiura
For beginners, starting with simple patterns like the Beadhead Pheasant Tail is an excellent way to hone your skills and create effective flies that will actually catch you fish.
In this step-by-step guide, we'll walk you through the process of tying a Beadhead Pheasant Tail, a versatile pattern that imitates various mayfly species that inhabit almost every river. this pattern is tied in sizes 12-24 and is a go-to pattern all year.
Whether you're new to fly tying or looking to expand your repertoire, this guide will help you craft a successful bead-headed pheasant tail nymph.
Step-by-Step Instructions:
Materials Needed:

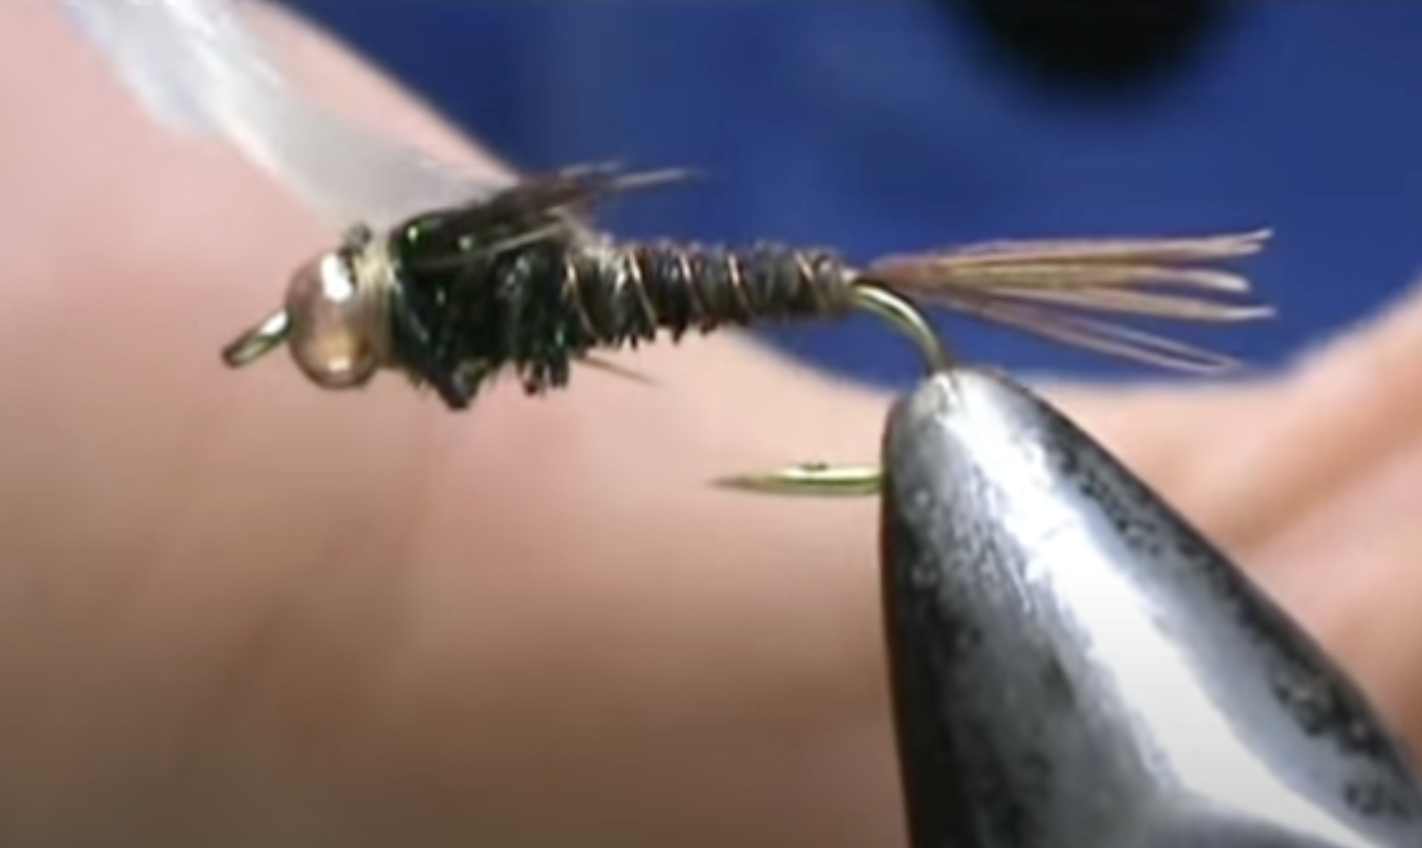
Hook: Size 12-18 nymph hook
Bead: Appropriate size to match the hook
Thread: 6/0 or 8/0 in a color matching the natural nymph
Tail: Pheasant tail fibers
Abdomen: Pheasant tail fibers
Ribbing: Copper wire
Thorax: Peacock herl
Wing case: Pheasant tail fibers
Legs: Pheasant tail fibers
Head cement or super glue
Step 1: Prepare the Hook

Start by securing the hook firmly in your vise. Ensure it's positioned properly and won't slip while tying.
Step 2: Add the Bead & Lead
Slide the bead onto the hook, a small hole first, and push it up to the eye of the hook. This bead will add weight to the fly and help it sink in the water. You can also add lead wraps now to make it even heavier if needed,
Step 3: Attach the Thread

Take your thread and make a few wraps around the hook shank, securing the bead in place. Trim off any excess thread.
Step 4: Tie in the Tail
Select a small bunch of pheasant tail fibers for the tail. Measure them to be about the length of the hook shank, then tie them in at the back of the hook with tight wraps of thread.

Step 5: Form the Abdomen
Take a few more pheasant tail fibers and tie them in at the back of the hook. Make touching wraps with the fibers to form the abdomen of the fly, stopping about two-thirds of the way up the hook shank.
Step 6: Add the Ribbing
Take a piece of copper wire and tie it in at the base of the abdomen. Make open spiraling wraps with the wire up the length of the abdomen, securing it with thread as you go.

Step 7: Create the Thorax
Select a small bunch of peacock herl and tie it in at the front of the abdomen. Make a few wraps to secure it, then use a dubbing loop or twist to create a dense thorax.
Step 8: Form the Wing Case
Take a few more pheasant tail fibers and tie them in at the front of the thorax. Pull them over the top of the fly to create a wing case and secure them with tight wraps of thread.
Step 9: Add the Legs
Take a small bunch of pheasant tail fibers and tie them in on either side of the fly, just behind the bead. These fibers will imitate the legs of the nymph.
Step 10: Finish the Fly
Trim off any excess materials, whip finish the fly with your thread, and add a small amount of head cement or super glue to secure the wraps. Your Beadhead Pheasant Tail is now ready to fish!
Congratulations! You've completed your first Beadhead Pheasant Tail fly.
As you continue to practice and experiment with different materials and techniques, you'll develop your skills and become a proficient fly tyer, So, grab your vise and materials, and start tying!
Below is a tutorial with Jim Misiura which you should definitely watch
From: Jim Misiura
Hook: 2xl Nymph
Bead: 3mm Copper
Thread: Brown
Tail: Pheasant
Rib: Copper Wire
Abdomen: Pheasant
Wingcase/Legs: Pheasant
Thorax: Peacock Herl